Setup
Need help with the tutorial? Join our Discord server!
A completed version of the game we'll create in this tutorial is available at:
https://github.com/clockworklabs/SpacetimeDB/tree/master/demo/Blackholio
Setting up the Tutorial Unreal Project
In this section, we will guide you through the process of setting up a Unreal Project that will serve as the starting point for our tutorial. By the end of this section, you will have a basic Unreal project and be ready to implement the server functionality.
Step 1: Create a Blank Unreal Project
SpacetimeDB supports Unreal version 5.6. See the overview for more information on specific supported versions.
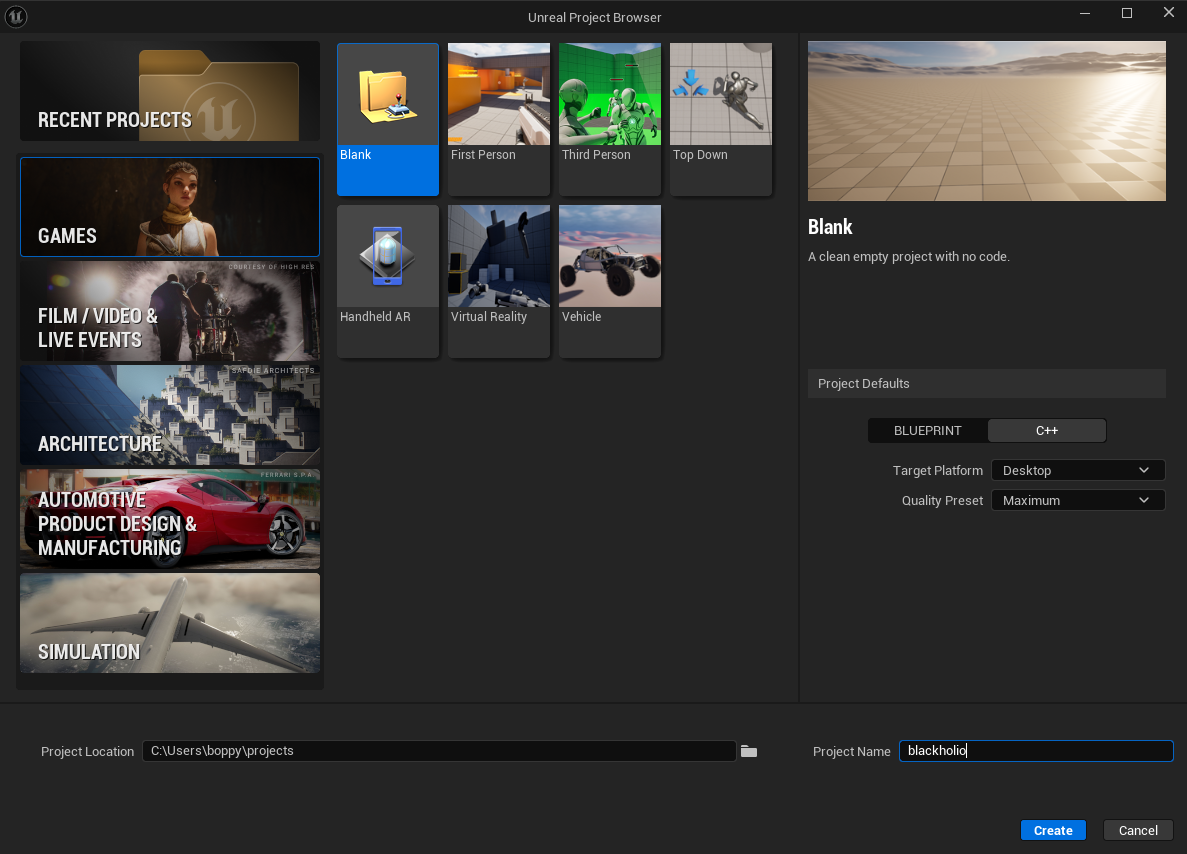
Launch Unreal 5.6 and create a new project by selecting Games from the Unreal Project Browser.
Select the Blank template and in Project Defaults select C++.
For Project Name use blackholio.
Click Create to generate the blank project.
Import the SpacetimeDB Unreal SDK
While the SpacetimeDB Unreal client SDK is in preview releases, it can only be installed from GitHub:
https://github.com/clockworklabs/SpacetimeDB/tree/master/sdks/unreal/src
Once the SDK is stabilized, we'll find a more ergonomic way to distribute it.
Before beginning make sure to close the Unreal project and IDE.
Installation steps
-
Navigate to your Unreal project directory and create a
Pluginsfolder if it doesn’t already exist:cd blackholio mkdir Plugins -
Download or clone the SDK from GitHub and copy the SpacetimeDbSdk folder into your new Plugins directory.
- This should create
/blackholio/Plugins/SpacetimeDbSdk.
- This should create
-
In the root of the Unreal project, right click the blackholio.uproject and select Generate Visual Studio project files. On Windows 11 you may need to expand Show more options to select the generate option.


Create the GameManager Actor
- C++
- Blueprint
- Open the
blackholioproject in your IDE (Visual Studio or JetBrains Rider) and run the project to launch the Unreal Editor.- This will enable Live Coding, making the workflow a bit smoother.
- Unreal will prompt you to build the
SpacetimeDbSdkplugin. Do so.
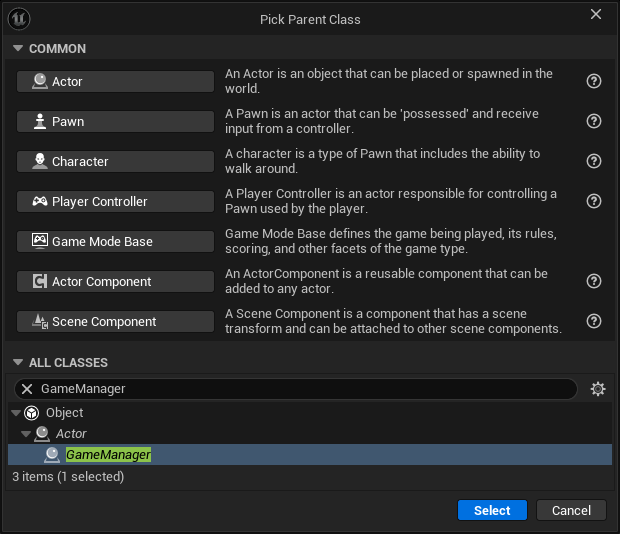
- Open Tools -> New C++ Class in the top menu, select Actor as the parent and click Next
- Select Public Class Type
- Name the class
GameManager.
The GameManager class will be where we will put the high level initialization and coordination logic for our game.
Note: In a production Unreal project, you would typically implement this logic in a Subsystem. For simplicity, this tutorial uses a singleton actor.
- Open the
client_unrealproject to launch the Unreal Editor. - Create a GameManager Blueprint
- In the Content Drawer, click Add, then select Blueprint -> Blueprint Class.
- Click Actor.
- Name the blueprint
BP_GameManager.
Set Up the Level
Set up the empty level, add the new GameManager to the level, and add lighting.
- C++
- Blueprint
-
Create a new level
- Open File -> New Level in the top menu, select Empty Level, and click Create.
- Save the level and name it
Blackholio.
-
Create a GameManager Blueprint
- In the Content Drawer, click Add, then select Blueprint -> Blueprint Class.
- Expand All Classes, search for GameManager, highlight it, and click Select.
- Name the blueprint
BP_GameManager.
-
Update Maps & Modes
- Open Edit -> Project Settings in the top menu, then select Project -> Maps & Modes on the left.
- Set Editor Startup Map to
Blackholio. - Set Game Default Map to
Blackholio.
-
Add to the Level
- Drag the
BP_GameManagerblueprint from the Content Drawer into the scene view.
- Drag the
-
Add a Directional Light
- Click Add in the top toolbar, then select Lights -> Directional Light.
- Set Rotation to -105.0, -31.0, -14.0.
-
Add a Post Process Volume
- Click Add in the top toolbar, then select Volumes -> Post Process Volume.
- Enable and set Exposure -> Exposure Compensation to 0.0.
- Enable and set Exposure -> Min EV100 to 1.0.
- Enable and set Exposure -> Max EV100 to 1.0.
- Enable Post Process Volume Settings -> Infinite Extend (Unbounded).
-
Create a new level
- Open File -> New Level in the top menu, select Empty Level, and click Create.
- Save the level and name it
Blackholio.
-
Update Maps & Modes
- Open Edit -> Project Settings in the top menu, then select Project -> Maps & Modes on the left.
- Set Editor Startup Map to
Blackholio. - Set Game Default Map to
Blackholio.
-
Add to the Level
- Drag the
BP_GameManagerblueprint from the Content Drawer into the scene view.
- Drag the
-
Add a Directional Light
- Click Add in the top toolbar, then select Lights -> Directional Light.
- Set Rotation to -105.0, -31.0, -14.0.
-
Add a Post Process Volume
- Click Add in the top toolbar, then select Volumes -> Post Process Volume.
- Enable and set Exposure -> Exposure Compensation to 0.0.
- Enable and set Exposure -> Min EV100 to 1.0.
- Enable and set Exposure -> Max EV100 to 1.0.
- Enable Post Process Volume Settings -> Infinite Extend (Unbounded).
Add a Simple GameMode
Create a simple GameMode to tweak the startup settings and connect it to the World Settings.
- C++
- Blueprint
-
Create the C++ class
- Open Tools -> New C++ Class in the top menu, select GameModeBase as the parent, and click Next.
- Select Public as the class type.
- Name the class
BlackholioGameMode.
-
Create a GameMode Blueprint
- In the Content Drawer, click Add, then select Blueprint -> Blueprint Class.
- Expand All Classes, search for
BlackholioGameMode, highlight it, and click Select. - Name the blueprint
BP_BlackholioGameMode.
-
Update World Settings
- Open Window -> World Settings in the top menu.
- Change GameMode Override from None to
BP_BlackholioGameMode. - Save the level.
-
Create a GameMode Blueprint
- In the Content Drawer, click Add, then select Blueprint -> Blueprint Class.
- Expand All Classes, and click
Game Mode Base. - Name the blueprint
BP_GameMode.
-
Update World Settings
- Open Window -> World Settings in the top menu.
- Change GameMode Override from None to
BP_GameMode. - Save the level.
At this point, the foundation of the Unreal project is set up. Pressing Play will show a blank screen, but the game should start without errors. Next, we’ll create the SpacetimeDB server module so we have something to connect to.
Create the Server Module
We've now got the very basics set up. In part 2 you'll learn the basics of how to create a SpacetimeDB server module and how to connect to it from your client.